
You can either watch this tutorial on Youtube below, or otherwise skip past it and read the text version (not all of the Puzzlescript tutorials are on Youtube yet but I plan to do that eventually).
All the different graphics in your Puzzle Script games represent objects. To make your own Sokoban games, you’ll want to make your own objects. This tutorial will show you how to design them and add them to the code. It assumes no prior programming knowledge except the previous Puzzle Script tutorials I have written.
If you’re using Puzzlescript as a prototyping tool for a bigger game, there’s actually a lot of freedom to create different kinds of objects that behave in different ways, which is what I did for Puzzledorf.

With Puzzledorf, I kept it pretty simple by just using multiple coloured blocks that had different destinations, and boulders that were just obstacles, but I experimented with all sorts of different objects. Magnets and pulling stuff, bombs, etc. So this is where you can start to have a little fun.
The Overview
Open the sample project here. The basic process of creating an object is:
- Design it in the objects list
- Add it to the legend
- Add it to a collision layer
Once you’ve done those steps you can start using the object.
Creating An Object
There are several objects already. Every game needs to have a background object. All objects are designed in a 5 x 5 pixel grid and must have at least one colour. Below is the background object.
 Background
 LIGHTGREEN GREEN
 11111
 01111
 11101
 11111
 10111
The numbers represent the pixels in the image. A different number refers to a different colour. The first colour is 0, the second is 1, right through to 9. You can have up to 10 colours. In this case, every 1 means paint this pixel Light Green, and ever 0 means paint it Green. The result looks like this:

Objects are always designed this way:
- Name
- Colours
- Design
The name is always on the top line. The colours are always on the second line, and the design takes up the next 5 lines, 5 characters per line, creating a 5 x 5 grid. Or you can do this:
 Background
 LIGHTGREEN
Which creates an object called ‘Background’ that is a 5 x 5 grid of light green. If you don’t specify a design grid, you will just get a block of colour, which sometimes might be useful.
Naming Your Object
You can name an object anything you want, but it can’t begin with a symbol and has to be one word with no spaces. Give your objects descriptive names, but don’t go overboard. PlayerStill is good, PlayerThatIsStandingStill is too long and wordy.
Colours
You have to declare which colours you want to use for your object, separated by a space. The Puzzle Script preset colours are:
- black
- white
- grey
- darkgrey
- lightgrey
- gray
- darkgray
- lightgray
- red
- darkred
- lightred
- brown
- darkbrown
- lightbrown
- orange
- yellow
- green
- darkgreen
- lightgreen
- blue
- lightblue
- darkblue
- purple
- pink
- transparent
You can also specify hexidecimal colours, giving you a much greater range of colours. To choose hex colours, use a website like this one. Select the colour you want with the colour picker, then type out the colour code, located above the image. Hex colour codes are written in puzzle script like:
 Name
 #51A2BD #ff0000 #ffffff
The colour code is always preceded with a hashtag #.
Add It To The Legend
Once you’ve made your object, you have to add it to the legend. The legend looks like this:
. = Background
# = Wall
P = Player
* = Crate
@ = Crate and Target
O = Target
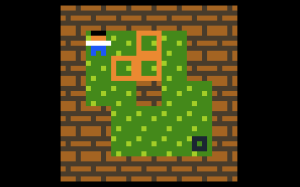
Each symbol represents an object in your level. So when you see this grid of symbols:
#p.*.##
#.**.##
#..#..#
##....#
##...o#
#######
It actually represents your level:
For each object you create, you need to assign it a letter, symbol or number that will represent that object in your levels. Just like:
P = player
Grouping Objects In The Legend
You can also create groups of objects in the legend. For example, if you had several different coloured crates, you could have:
O = OrangeCrate
B = BlueCrate
G = GreenCrate
Which would allow you to use your crates in the level editor. But for coding purposes, you can group them all together, in the Legend, like so:
Crates = OrangeCrate or GreenCrate or BlueCrate
So that altogether it would look like:
=======
LEGEND
=======
O = OrangeCrate
B = BlueCrate
G = GreenCrate

Crates = OrangeCrate or GreenCrate or BlueCrate
Why would you do this? Because then, instead of the following rules:
[ > Player | OrangeCrate ] -> [ > Player | > OrangeCrate ]
[ > Player | BlueCrate] -> [ > Player | > BlueCrate ]
[ > Player | GreenCrate] -> [ > Player | > GreenCrate]
You can simply write:
[ > Player | Crates ] -> [ > Player | > Crates ]
And that code would work for your entire group of objects.
Also, in the Collision Layers section that follows, you can just reference which layer the group is on, rather than typing out every individual object.
Collision Layers
The default collision layers section looks like this:
 Background
 Target
 Player, Wall, Crate
Each line separates objects into their own layer. The order in which you place your objects in layers determines which objects will be seen on top of others. Objects on the top line are on the bottom layer, the next line is the layer on top of that, and so on. The background must always be by itself on the top line so that it is always on the bottom layer. Objects on the same layer cannot be on top of each other. So you cannot have:
[ player wall ] -> [ player wall ]
You can have objects on different layers interact with each other. Eg, you could write:
[ > Player | Target ] -> [ > Player | > Target ]
Experiment
Make a few new objects. Make a type of crate you can only push. Make a different crate you can only pull. Make a crate that disappears when you touch it. By continuing to make things you will remember it better.
Conclusion
See the finished sample project here. The next tutorial discusses the win conditions and how to create different puzzle types for your Sokoban game.
Next Tutorial >
If you liked this article, please check out Puzzledorf to show your support. If you enjoy playing, leaving a review helps the games visibility on Steam.


Leave a comment